Salt是一个分布式远程执行系统,用来在远程节点上执行命令和查询数据。学习环境下我们也许没有那么多服务器可以用来学习,使用虚拟机效率又太低下,这时我们可利用之前文章学的Docker 来进行部署学习。
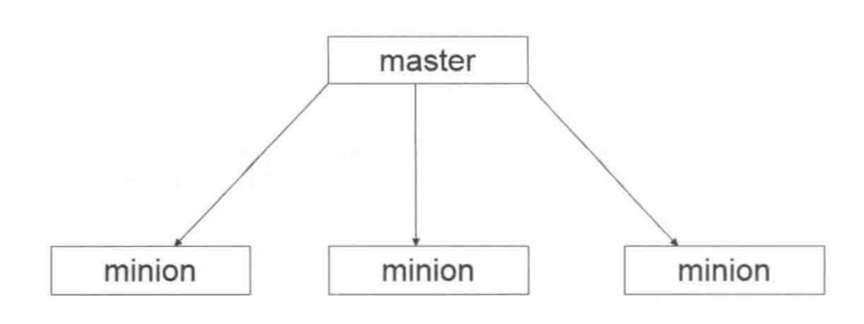
基本架构 在安装salt之前,先理解salt架构中各个角色,主要区分是salt-master和salt-minion,顾名思义master是中心控制系统,minion是被管理的客户端。
salt架构中的一种就是master > minion。
环境准备
服务器环境
centos7centos7centos7
ip地址172.17.0.2
172.17.0.3
172.17.0.4
身份
masterslaveslave
软件包
salt-mastersalt-minionsalt-minion
使用docker开启以上三个镜像并在三个镜像中hosts文件都添加以下三行,关于如何下载和运行镜像参考之前的文章Docker基础使用 ,后面会有坑,也在后面填坑。
1
2
3
172.17.0.2 master 172.17.0.3 slave1 172.17.0.4 slave2
记得也要关闭防火墙
安装saltstack salt软件包需要epel源的支持,那么下载
EPEL的全称叫 Extra Packages for Enterprise Linux 。EPEL是由 Fedora 社区打造,为 RHEL 及衍生发行版如 CentOS、Scientific Linux 等提供高质量软件包的项目。装上了 EPEL之后,就相当于添加了一个第三方源。
1
2
3
4
wget -O /etc/yum.repos.d/CentOS-Base.repo http://mirrors.aliyun.com/repo/Centos-7.repo wget -O /etc/yum.repos.d/epel.repo http://mirrors.aliyun.com/repo/epel-7.repo yum clean all #清空缓存 yum makecache #生成yum缓存
安装好epel源就可以开始安装salt了
主机安装salt-master
1 yum install salt-master -y
从机安装salt-minion
1 yum install salt-minion -y
salt端口安装好salt之后开始配置,salt-master默认监听两个端口:
1
2
3
4505 publish_port 提供远程命令发送功能 4506 ret_port 提供认证,文件服务,结果收集等功能 # 确保客户端可以通信服务器的此2个端口,保证防火墙允许端口通过。因此在测试环境直接关闭防火墙。
配置文件 1 2 3 salt-master的配置文件是/etc/salt/master salt-minion的配置文件是/etc/salt/minion 配置文件中包含了大量可调整的参数,这些参数控制master和minion各个方面
salt-master常用配置1 2 3 4 5 6 7 8 9 10 11 12 13 14 15 16 17 18 # salt运行的用户,影响到salt的执行权限 user: root #s alt的运行线程,开的线程越多一般处理的速度越快,但一般不要超过CPU的个数 worker_threads: 10 # master的管理端口 publish_port : 4505 # master跟minion的通讯端口,用于文件服务,认证,接受返回结果等 ret_port : 4506 # 如果这个master运行的salt-syndic连接到了一个更高层级的master,那么这个参数需要配置成连接到的这个高层级master的监听端口 syndic_master_port : 4506 # 指定pid文件位置 pidfile: /var/run/salt-master.pid
salt-slave常用配置1 2 3 4 5 6 7 8 9 10 11 12 13 14 15 16 17 18 19 20 21 22 23 24 25 26 27 28 29 # minion的识别ID,可以是IP,域名,或是可以通过DNS解析的字符串 id: slave # salt运行的用户权限 user: root # master的识别ID,可以是IP,域名,或是可以通过DNS解析的字符串 master : master # master通信端口 master_port: 4506 # 备份模式,minion是本地备份,当进行文件管理时的文件备份模式 backup_mode: minion # 执行salt-call时候的输出方式 output: nested # minion等待master接受认证的时间 acceptance_wait_time: 10 # 失败重连次数,0表示无限次,非零会不断尝试到设置值后停止尝试 acceptance_wait_time_max: 0 # 重新认证延迟时间,可以避免因为master的key改变导致minion需要重新认证的syn风暴 random_reauth_delay: 60 # 日志文件位置 log_file: /var/logs/salt_minion.log
本人主从机配置 主机配置 1 2 3 4 5 6 7 8 9 10 11 12 13 14 15 16 # 绑定到本地的0.0.0.0地址 interface: 0.0.0.0 # 管理端口,命令发送 publish_port: 4505 # 运行salt进程的用户 user: root # salt运行线程数,线程越多处理速度越快,不要超过cpu个数 worker_threads: 5 # 执行结果返回端口 ret_port: 4506 # pid文件位置 pidfile: /var/run/salt-master.pid # 日志文件地址 log_file: /var/log/salt/master # 自动接收minion的key # auto_accept: False
从机1配置 1 2 3 4 5 6 7 8 9 10 11 12 # 主机hosts解析字符串 master: master # master通信端口 master_port: 4506 # salt运行的用户权限 user: root # minion的识别ID,可以是IP,域名,或是可以通过DNS解析的字符串 id: slave1 # minion等待master接受认证的时间 acceptance_wait_time: 10 # 日志文件位置 log_file: /var/log/salt/minion
从机2配置 1 2 3 4 5 6 7 8 9 10 11 12 # 主机hosts解析字符串 master: master # master通信端口 master_port: 4506 # salt运行的用户权限 user: root # minion的识别ID,可以是IP,域名,或是可以通过DNS解析的字符串 id: slave2 # minion等待master接受认证的时间 acceptance_wait_time: 10 # 日志文件位置 log_file: /var/log/salt/minion
启动salt 主从机上分别启动salt
1 2 systemctl start salt-minion systemctl start salt-master
此处有坑:
本人启动salt时出现以下错误:Failed to get D-Bus connection: Operation not permitted
起初以为是docker中使用salt出现的问题,百度后发现是这样解释的。出错的原因是因为在docker中使用了systemctl命令。systemd,这个套件已经成为主流Linux发行版(比如CentOS7、Ubuntu14+)默认的服务管理,取代了传统的SystemV风格服务管理。systemd维护系统服务程序,它需要特权去会访问Linux内核。而容器并不是一个完整的操作系统,只有一个文件系统,而且默认启动只是普通用户这样的权限访问Linux内核,也就是没有特权,所以自然就用不了!
因此,请遵守容器设计原则,一个容器里运行一个前台服务!我们可以利用特权模式来启动该容器。启动流程如下:
运行容器 1 2 # xxx代表容器id前三位,也可写容器名称 docker run --privileged -it xxx init
进入容器 1 2 # xxx代表运行中的容器id前三位 docker exec -it xxx bash
此时systemctl可以正常使用了,我们使用start分别启动三台服务器上的salt,查看下状态:
1 2 3 4 5 6 7 8 9 10 11 12 13 14 15 16 17 18 19 20 21 22 [root@e23e0da47946 /]# systemctl status salt-master ● salt-master.service - The Salt Master Server Loaded: loaded (/usr/lib/systemd/system/salt-master.service; disabled; vendor preset: disabled) Active: active (running) since Tue 2019-09-17 07:01:25 UTC; 50min ago Main PID: 234 (salt-master) CGroup: /docker/e23e0da479464a1206b9450a5556dfec6b02ba25adaec97057f4b00deb287233/syste m.slice/salt-master.service ├─234 /usr/bin/python /usr/bin/salt-master ├─242 /usr/bin/python /usr/bin/salt-master ├─243 /usr/bin/python /usr/bin/salt-master ├─244 /usr/bin/python /usr/bin/salt-master ├─248 /usr/bin/python /usr/bin/salt-master ├─250 /usr/bin/python /usr/bin/salt-master ├─251 /usr/bin/python /usr/bin/salt-master ├─254 /usr/bin/python /usr/bin/salt-master ├─257 /usr/bin/python /usr/bin/salt-master ├─260 /usr/bin/python /usr/bin/salt-master └─265 /usr/bin/python /usr/bin/salt-master ‣ 234 /usr/bin/python /usr/bin/salt-master Sep 17 07:01:25 e23e0da47946 systemd[1]: Starting The Salt Master Server... Sep 17 07:01:25 e23e0da47946 systemd[1]: Started The Salt Master Server.
1 2 3 4 5 6 7 8 9 10 [root@8d6a7a1f159f /]# systemctl status salt-minion ● salt-minion.service - The Salt Minion Loaded: loaded (/usr/lib/systemd/system/salt-minion.service; disabled; vendor preset: disabled) Active: active (running) since Tue 2019-09-17 07:05:25 UTC; 47min ago Main PID: 398 (salt-minion) CGroup: /docker/8d6a7a1f159f329e2c1d26f1f5ba976dc3541ef779f05a3f61d7ec5935ba191d/syste m.slice/salt-minion.service ├─398 /usr/bin/python /usr/bin/salt-minion └─401 /usr/bin/python /usr/bin/salt-minion ‣ 398 /usr/bin/python /usr/bin/salt-minion
1 2 3 4 5 6 7 8 9 10 [root@8efbb15347d0 /]# systemctl status salt-minion ● salt-minion.service - The Salt Minion Loaded: loaded (/usr/lib/systemd/system/salt-minion.service; disable d; vendor preset: disabled) Active: active (running) since Tue 2019-09-17 07:05:35 UTC; 12s ago Main PID: 228 (salt-minion) CGroup: /docker/8efbb15347d081b3a36b30c7e024ccf97d54bd5596830b9bd122 e33a8823517f/system.slice/salt-minion.service ├─228 /usr/bin/python /usr/bin/salt-minion └─231 /usr/bin/python /usr/bin/salt-minion ‣ 228 /usr/bin/python /usr/bin/salt-minion
三台服务器运行正常。
主机接收从机密匙 在minion启动后连接master会请求master为其签发证书,等待证书签发完成后,master可以信任minion,并且minion和master之间的通信是加密的。
在salt-master执行
salt-key命令用于管理mionion秘钥
1 2 3 4 5 6 7 [root@e23e0da47946 /]# salt-key -L Accepted Keys: Denied Keys: Unaccepted Keys: slave1 slave2 Rejected Keys:
此时两个从机已经出现在unaccepted keys中,说明minion已经和master联系,并且master已经获取了minion的公钥,等待下一步指令。
检查master和minion的秘钥匹配 在master上执行
1 2 3 4 5 6 7 [root@e23e0da47946 /]# salt-key -F Local Keys: Accepted Keys: Unaccepted Keys: slave1: 09:d0:95:28:41:21:d7:0b:1a:81:8f:42:e0:a7:77:1a slave2: 4c:18:d8:2f:3e:de:4d:33:a9:84:82:2f:a0:4f:09:00
在从机上获取密匙
1 2 3 4 5 6 7 8 9 [root@8d6a7a1f159f /]# salt-call --local key.finger local: 09:d0:95:28:41:21:d7:0b:1a:81:8f:42:e0:a7:77:1a [root@8efbb15347d0 salt]# salt-call --local key.finger local: 4c:18:d8:2f:3e:de:4d:33:a9:84:82:2f:a0:4f:09:00
主从机显示一致,在master上接收密匙
1 2 3 4 5 6 7 8 9 10 11 12 13 [root@e23e0da47946 /]# salt-key -a slave1 The following keys are going to be accepted: Unaccepted Keys: slave1 Proceed? [n/Y] y Key for minion slave1 accepted. [root@e23e0da47946 /]# salt-key -a slave2 The following keys are going to be accepted: Unaccepted Keys: slave2 Proceed? [n/Y] y Key for minion slave2 accepted.
确认接收秘钥后,检验minion秘钥是否被接收
1 2 3 4 5 6 7 [root@e23e0da47946 /]# salt-key -L Accepted Keys: slave1 slave2 Denied Keys: Unaccepted Keys: Rejected Keys:
两个从机接收成功
salt-key 常用参数: 1 2 3 4 5 6 7 8 9 10 11 12 13 14 15 16 [root@linux-node1 ~]# salt-key -L Accepted Keys: #已经接受的key Denied Keys: #拒绝的key Unaccepted Keys:#未加入的key Rejected Keys:#吊销的key #常用参数 -L #查看KEY状态 -A #允许所有 -D #删除所有 -a #认证指定的key -d #删除指定的key -r #注销掉指定key(该状态为未被认证) #在master端/etc/salt/master配置 auto_accept: True #如果对Minion信任,可以配置master自动接受请求
基本使用: 1 2 3 4 5 6 7 8 9 10 11 12 13 14 15 16 17 18 19 20 #列出当前所有的key [root@salt0-master ~]# salt-key Accepted Keys: salt1-minion.example.com salt2-minion.example.com salt3-minion.example.com salt4-minion.example.com Denied Keys: Unaccepted Keys: Rejected Keys: #添加指定minion的key [root@salt0-master ~]# salt-key -a salt1-minion.example.com -y #添加所有minion的key [root@salt0-master ~]# salt-key -A -y #删除指定的key [root@salt0-master ~]# salt-key -d salt1-minion.example.com -y #删除所有的key [root@salt0-master ~]# salt-key -D -y
已安装文件说明 首先知道master和minion都安装了什么文件,然后才知道怎么操作
master端
1 2 3 4 5 6 /etc/salt/master # salt master主配置文件 /usr/bin/salt #salt master 核心操作命令 /usr/bin/salt-cp #salt 文件传输命令 /usr/bin/salt-key #salt证书管理 /usr/bin/salt-master #salt master 服务命令 /usr/bin/salt-run #salt master runner命令
slave端
1 2 3 4 5 [root@slave ~]$rpm -ql salt-minion /etc/salt/minion #minion配置文件 /usr/bin/salt-call #拉取命令 /usr/bin/salt-minion #minion服务命令 /usr/lib/systemd/system/salt-minion.service #minion启动脚本
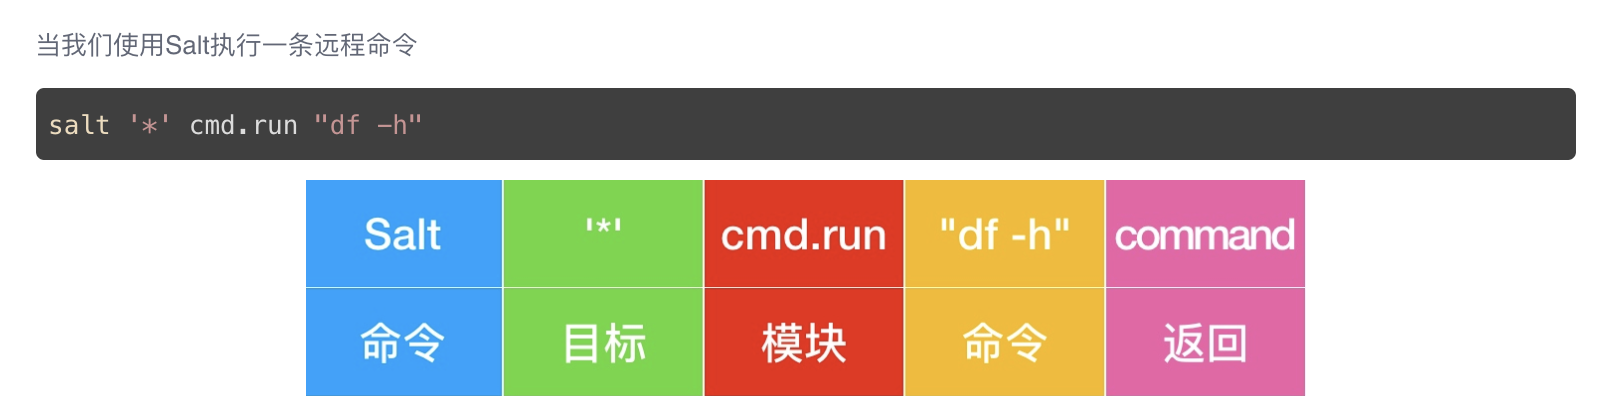
测试salt命令 这是条很简单的探测minion主机存活命令,也是远程执行命令,我们通过master发送消息给”*”所有的minion,并且告诉他们运行salt内置的命令(也是python模块中的一个函数),返回true表示slave机器监控存活。
1 2 3 4 5 6 7 8 # salt 是一个命令 # * 表示目标主机, 在这里代表所有目标主机 # test.ping是salt远程执行的一个模块下面的方法。 [root@master /]# salt '*' test.ping slave1: True slave2: True
test模块其他函数
1 2 3 4 5 6 7 8 9 10 11 12 13 14 15 16 17 18 19 20 21 22 23 24 25 26 27 28 29 30 31 32 33 34 35 36 37 38 39 40 41 42 43 44 45 46 47 48 49 50 51 52 53 54 55 56 57 58 59 60 61 62 63 64 [root@master etc]# salt '*' sys.list_functions test slave2: - test.arg - test.arg_repr - test.arg_type - test.assertion - test.attr_call - test.collatz - test.conf_test - test.cross_test - test.echo - test.exception - test.fib - test.get_opts - test.kwarg - test.module_report - test.not_loaded - test.opts_pkg - test.outputter - test.ping - test.provider - test.providers - test.rand_sleep - test.rand_str - test.retcode - test.sleep - test.stack - test.try_ - test.tty - test.version - test.versions_information - test.versions_report slave1: - test.arg - test.arg_repr - test.arg_type - test.assertion - test.attr_call - test.collatz - test.conf_test - test.cross_test - test.echo - test.exception - test.fib - test.get_opts - test.kwarg - test.module_report - test.not_loaded - test.opts_pkg - test.outputter - test.ping - test.provider - test.providers - test.rand_sleep - test.rand_str - test.retcode - test.sleep - test.stack - test.try_ - test.tty - test.version - test.versions_information - test.versions_report
示例打印字符串:
1 2 3 4 5 6 [root@master etc]# salt '*' test.echo 'tony 666' slave2: tony 666 slave1: tony 666
示例生成斐波那切数列
1 2 3 4 5 6 7 8 9 10 11 12 13 14 15 16 17 18 19 20 21 22 23 24 25 26 27 [root@e23e0da47946 etc]# salt '*' test.fib 50 slave2: |_ - 0 - 1 - 1 - 2 - 3 - 5 - 8 - 13 - 21 - 34 - 1.90734863281e-06 slave1: |_ - 0 - 1 - 1 - 2 - 3 - 5 - 8 - 13 - 21 - 34 - 1.90734863281e-06
salt命令结构命令行输入的命令叫做执行模块,而把命令写入到文件中就叫做状态模块。
salt语法
1 2 3 4 [root@master 192.168.199.155 ~]$salt --help Usage: salt [options] '<target>' <function> [arguments] # salt命令 参数 目标 salt模块的函数 远程执行的参数
打印从机hostname 1 2 3 4 5 6 7 8 9 10 11 12 13 14 15 16 #--summary参数显示salt命令的概要 [root@master etc]# salt --summary '*' cmd.run 'hostname' slave1: 8d6a7a1f159f slave2: 8efbb15347d0 ------------------------------------------- Summary ------------------------------------------- # of Minions Targeted: 2 # of Minions Returned: 2 # of Minions Did Not Return: 0 -------------------------------------------
列出从机sys模块 1 [root@master etc]# salt '*' sys.list_modules
查看从机python进程 cmd是超级模块,所有shell命令都能执行
1 2 3 4 5 6 7 8 9 10 11 12 13 14 [root@e23e0da47946 etc]# salt '*' cmd.run 'ps -ef | grep python' slave1: root 398 1 0 07:05 ? 00:00:00 /usr/bin/python /usr/bin/salt-minion root 401 398 0 07:05 ? 00:00:00 /usr/bin/python /usr/bin/salt-minion root 1306 1 0 08:23 ? 00:00:00 /usr/bin/python /usr/bin/salt-minion root 1307 1306 0 08:23 ? 00:00:00 /bin/sh -c ps -ef | grep python root 1309 1307 0 08:23 ? 00:00:00 grep python slave2: root 228 1 0 07:05 ? 00:00:00 /usr/bin/python /usr/bin/salt-minion root 231 228 0 07:05 ? 00:00:00 /usr/bin/python /usr/bin/salt-minion root 1190 1 0 08:23 ? 00:00:00 /usr/bin/python /usr/bin/salt-minion root 1191 1190 0 08:23 ? 00:00:00 /bin/sh -c ps -ef | grep python root 1193 1191 0 08:23 ? 00:00:00 grep python
远程操作从机nginx 1 2 3 4 5 6 7 8 9 10 # 从机全部安装nginx [root@e23e0da47946 etc]# salt '*' pkg.install 'nginx' # 所有从机卸载nginx [root@e23e0da47946 etc]# salt '*' pkg.install 'nginx' # 查看所有从机pkg包版本 [root@e23e0da47946 etc]# salt '*' pkg.version "nginx" slave2: 1:1.12.2-3.el7 slave1: 1:1.12.2-3.el7
远程管理服务模块 管理服务是系统管理员的重要任务,通过salt管理minion服务会很简单,使用service模块
1 2 3 4 5 6 7 8 9 10 11 12 13 14 15 16 17 18 19 20 # 启动nginx [root@e23e0da47946 etc]# salt '*' service.start 'nginx' slave1: True slave2: False # 停止nginx [root@e23e0da47946 etc]# salt '*' service.stop "nginx" slave2: True slave1: True # 查看nginx状态 [root@e23e0da47946 etc]# salt '*' service.status "nginx" slave2: True slave1: True
--out控制salt输出格式分别用json和yaml格式显示
1 2 3 4 5 6 7 8 9 10 11 12 13 14 15 16 17 18 19 20 21 22 23 24 25 26 27 28 29 [root@master etc]# salt --out=json '*' cmd.run_all 'hostname' { "slave1": { "pid": 1545, "retcode": 0, "stderr": "", "stdout": "8d6a7a1f159f" } } { "slave2": { "pid": 1445, "retcode": 0, "stderr": "", "stdout": "8efbb15347d0" } } [root@master etc]# salt --out=yaml '*' cmd.run_all 'hostname' slave1: pid: 1551 retcode: 0 stderr: '' stdout: 8d6a7a1f159f slave2: pid: 1451 retcode: 0 stderr: '' stdout: 8efbb15347d0
关于yaml语言格式参考阮一峰博客:http://www.ruanyifeng.com/blog/2016/07/yaml.html
目标定位字符串(类似正则) 使用目标定位字符串目的就是当要管理的服务器数量很多,精确定位某一台或有规律的某几台服务器进行操作。
1 2 3 4 5 6 7 8 9 10 11 12 13 14 15 16 17 18 19 1.全局匹配 [root@master ~]$salt '*' test.ping slave: True Linux通配符 * 代表任意字符,或空字符串 ? 代表一个字符,不可以为空 [a-z] [0-9] 代表任何一个小写字母 [root@master ~]$salt 'slav?' test.ping slave1: True slave2: True [root@master ~]$salt '[a-z]lave1' test.ping slave1: True