当我们的网站处于发展初期的时候,nginx只代理了后端一台服务器,但由于我们网站名气大涨访问的人越来越多一台服务器实在是顶不住,于是我们加了多台服务器,使用之前的服务器配置其nginx代理,指向多台服务器上的网站,以减轻一台服务器压力,这就是负载均衡。下面说下如何搭建nginx负载均衡。
Nginx概述Web服务器,直接面向用户,往往要承载大量并发请求,单台服务器难以负荷,我使用多台WEB服务器组成集群,前端使用Nginx负载均衡,将请求分散的打到我们的后端服务器集群中,实现负载的分发。那么会大大提升系统的吞吐率、请求性能、高容灾。
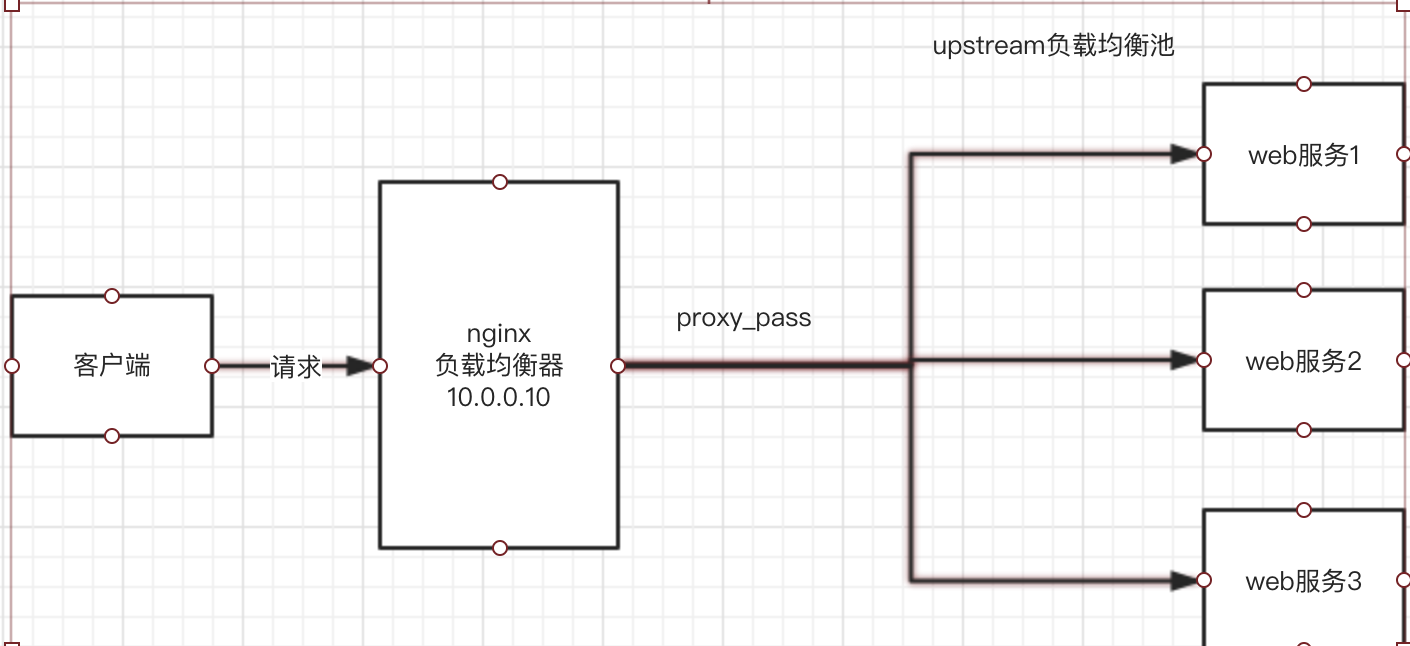
Nginx要实现负载均衡需要用到proxy_pass代理模块配置Nginx负载均衡与Nginx代理不同地方在于Nginx代理仅代理一台服务器,而Nginx负载均衡则是将客户端请求代理转发至一组upstream虚拟服务池Nginx可以配置代理多台服务器,当一台服务器宕机之后,仍能保持系统可用。
upstream配置在nginx.conf > http 区域中
1
2
3
4
upstream myslb { server 10.0.0.10:8000 ; server 10.0.0.11:9000 ; }
在nginx.conf > http 区域 > server区域 > location配置中
添加proxy_pass
1
2
3
4
5
location / { root html; index index.html index.htm; proxy_pass http://myslb; }
此时初步负载均衡已经完成,upstream默认按照轮训方式负载,每个请求按时间顺序逐一分配到后端节点。
upstream分配策略weight 权重谁的权重大优先或访问谁的几率更大
1
2
3
4
upstream myslb { server 10.0.0.10:8000 weight=5 ; server 10.0.0.11:9000 weight=10 ; }
ip_hash1 2 3 4 5 6 upstream myslb { ip_hash; server 10.0.0.10:8000 ; server 10.0.0.11:9000 ; }
backup在非backup机器繁忙或者宕机时,请求backup机器,因此机器默认压力最小
1 2 3 4 5 upstream myslb { server 10.0.0.10:8000 weight=5 ; server 10.0.0.11:9000 ; server node.oldboy.com:8080 backup; }
负载均衡实例 模拟环境 1 2 3 4 5 角色 ip 系统 访问者 10.10.10.11 win10 负载服务器(master) 10.10.10.21 linux 服务器1 10.10.10.22 linux 服务器2 10.10.10.23 linux
关闭防火墙 1 2 3 4 5 iptables -F sed -i 's/enforcing/disabled/' /etc/selinux/config systemctl stop firewalld systemctl disable firewalld
配置服务器1、2 1 2 3 4 5 6 7 8 9 10 11 12 13 14 15 16 17 18 19 20 21 22 23 24 25 26 27 28 29 30 31 32 33 server { listen 80 ; server_name 10.10.10.22 ; location / { root /node; index index.html index.htm; } } mkdir /nodeecho 'i am web01' > /node/index.html nginx -s reload server { listen 80 ; server_name 10.10.10.23 ; location / { root /node; index index.html index.htm; } } mkdir /nodeecho 'i am web02' > /node/index.html nginx -s reload
配置负载服务器 配置nginx配置文件
1 2 3 4 5 6 7 8 9 10 11 12 13 14 15 16 17 18 http { include mime.types; default_type application/octet-stream; sendfile on ; keepalive_timeout 65 ; upstream node { server 10.10.10.22:80 ; server 10.10.10.23:80 ; } server { listen 80 ; server_name 10.10.10.21 ; location / { proxy_pass http://node; include proxy_params; } } }
手动创建proxy_params文件,文件中存放代理的请求头相关参数
1 2 3 4 5 6 7 8 9 10 11 12 proxy_set_header Host $http_host ;proxy_set_header X-Real-IP $remote_addr ;proxy_set_header X-Forwarded-For $proxy_add_x_forwarded_for ;proxy_connect_timeout 30 ;proxy_send_timeout 60 ;proxy_read_timeout 60 ;proxy_buffering on ;proxy_buffer_size 32k ;proxy_buffers 4 128k ;
重启负载服务器
测试访问 在10.10.10.11电脑上使用浏览器刷新访问10.10.10.21,浏览器交替显示“i am web01...” 或 “i am web02...“。
负载均衡调度算法 1 2 3 4 5 6 调度算法 概述 轮询 按时间顺序逐一分配到不同的后端服务器(默认) weight 加权轮询,weight值越大,分配到的访问几率越高 ip_hash 每个请求按访问IP的hash结果分配,这样来自同一IP的固定访问一个后端服务器 url_hash 按照访问URL的hash结果来分配请求,是每个URL定向到同一个后端服务器 least_conn 最少链接数,那个机器链接数少就分发
1.轮询(不做配置,默认轮询)
2.weight权重(优先级)
3.ip_hash配置,根据客户端ip哈希分配,不能和weight一起用
动静分离负载均衡
环境准备 1 2 3 4 系统 服务 软件 ip地址 centos7(lb01) 负载均衡 nginx proxy 192.168.119.10 centos7(web01) 静态资源 nginx静态资源 192.168.119.11 centos7(web02) 动态资源 flask 192.168.119.12
配置web01静态资源站 1 2 3 4 5 6 7 8 9 10 11 12 13 14 15 16 17 18 19 20 21 22 23 24 25 26 27 28 cat nginx.confserver { listen 80 ; server_name 192.168.119.11 ; root /code; index index.html; location ~* .*\.(png|jpg|gif)$ { root /code/images; } ./sbin/nginx mkdir -p /code/images [root@web01 /code]$cat index.html static files... [root@web01 /code/images]$wget http://pythonav.cn/av/girlone.jpg [root@web01 /code/images]$ls girlone.jpg
配置web02动态服务器 准备flask应用 1 2 3 4 5 6 7 from flask import Flaskapp=Flask(__name__) @app.route('/' def hello (): return "i am flask....from nginx" if __name__=="__main__" : app.run(host='0.0.0.0' ,port=8080 )
运行flask 配置lb01负载主服务器 1 2 3 4 5 6 7 8 9 10 11 12 13 14 15 16 17 18 19 20 21 22 23 24 cat nginx.confupstream static { server 192.168.119.11:80 ;} upstream flask {server 192.168.119.12:8080 ;} server { listen 80 ; server_name 192.168.119.10 ; location / { proxy_pass http://flask; include proxy_params; } location ~ .*\.(png|jpg|gif)$ { proxy_pass http://static; include proxy_params; }
访问测试 使用浏览器访问192.168.119.10,访问结果: