提供 Web 网络服务的程序有 IIS、Nginx 和 Apache 等。其中,IIS(Internet Information Services,互联网信息服务)是 Windows 系统中默认的 Web 服务程序
Nginx 程序作为一款轻量级的网站服务软件,因其稳定性和丰富的功能而快速占领服务器市 场,但 Nginx 最被认可的还当是系统资源消耗低且并发能力强,因此得到了国内诸如新浪、 网易、腾讯等门户站的青睐。
nginx介绍nginx是一个开源的,支持高性能,高并发的www服务和代理服务软件。它是一个俄罗斯人lgor sysoev开发的,作者将源代码开源出来供全球使用。nginx比它大哥apache性能改进许多,nginx占用的系统资源更少,支持更高的并发连接,有更高的访问效率。nginx不但是一个优秀的web服务软件,还可以作为反向代理,负载均衡,以及缓存服务使用。
优点:
支持高并发,能支持几万并发连接
资源消耗少,在3万并发连接下开启10个nginx线程消耗的内存不到200M
可以做http反向代理和负载均衡
支持异步网络i/o事件模型epoll
Tengine是由淘宝网发起的Web服务器项目。它在Nginx的基础上,针对大访问量网站的需求,添加了很多高级功能和特性。Tengine的性能和稳定性已经在大型的网站如淘宝网,天猫商城等得到了很好的检验。它的最终目标是打造一个高效、稳定、安全、易用的Web平台。
安装准备 一. gcc 安装nginx 需要先将官网下载的源码进行编译,编译依赖 gcc 环境,如果没有 gcc 环境,则需要安装:
二. PCRE pcre-devel 安装PCRE(Perl Compatible Regular Expressions) 是一个Perl库,包括 perl 兼容的正则表达式库。nginx 的 http 模块使用 pcre 来解析正则表达式,所以需要在 linux 上安装 pcre 库,pcre-devel 是使用 pcre 开发的一个二次开发库。nginx也需要此库。命令:
1 yum install -y pcre pcre-devel
三. zlib 安装zlib 库提供了很多种压缩和解压缩的方式, nginx 使用 zlib 对 http 包的内容进行 gzip ,所以需要在 Centos 上安装 zlib 库。
1 yum install -y zlib zlib-devel
四. OpenSSL 安装OpenSSL 是一个强大的安全套接字层密码库,囊括主要的密码算法、常用的密钥和证书封装管理功能及 SSL 协议,并提供丰富的应用程序供测试或其它目的使用。nginx 不仅支持 http 协议,还支持 https(即在ssl协议上传输http),所以需要在 Centos 安装 OpenSSL 库。
小白安装nginx前可以直接执行以下代码
1 yum install gcc patch libffi-devel python-devel zlib-devel bzip2-devel openssl-devel ncurses-devel sqlite-devel readline-devel tk-devel gdbm-devel db4-devel libpcap-devel xz-devel openssl openssl-devel -y
安装 按照方式两种:
使用yum 或者apt-get方式: 1 2 3 yum install nginx 或 apt-get install nginx
使用源码安装: 1 2 3 4 5 6 7 wget -c https://nginx.org/download/nginx-1 .12.0 .tar.gztar -zxvf nginx-1 .12.0 .tar.gz ./configure --prefix =/opt/nginx1-12 / --with-http_ssl_module --with-http_stub_status_module make && make install
Mac电脑安装nginx 对于现在越来越多的苹果用户,大家的测试环境也转移到了苹果上,苹果默认自带的是apache,如果你要在mac上安装nginx需要工具brew,这也是mac安装大多数软件的工具。
安装完成
1 2 3 4 5 6 7 8 9 10 11 12 ==> nginx Docroot is: /usr/local/var/www The default port has been set in /usr/local/etc/nginx/nginx.conf to 8080 so that nginx can run without sudo. nginx will load all files in /usr/local/etc/nginx/servers/. To have launchd start nginx now and restart at login: brew services start nginx Or, if you don't want/need a background service you can just run: nginx
启动 1 2 3 4 5 cd sbin./nginx ./nginx -s stop ./nginx -s reload
检测 1 2 3 netstat -tunlp |grep 80 curl -I 127.0.0.1 #如果访问不了,检查selinux,iptables防火墙
Nginx的目录结构1 2 [root@VM_59_235_centos nginx]# ls client_body_temp conf fastcgi_temp html logs proxy_temp sbin scgi_temp uwsgi_temp
conf 存放nginx所有配置文件的目录,主要nginx.confhtml 存放nginx默认站点的目录,如index.html、error.html等logs 存放nginx默认日志的目录,如error.log access.logsbin 存放nginx主命令的目录,sbin/nginx
Nginx主配置文件解析Nginx主配置文件nginx.conf是一个纯文本类型的文件,整个配置文件是以区块的形式组织的。一般,每个区块以一对大括号{}来表示开始与结束。
1 2 3 4 5 6 7 8 9 10 11 12 13 14 15 16 17 18 19 20 21 22 23 24 25 26 27 28 29 30 31 32 33 34 35 36 37 38 39 40 41 42 43 44 45 46 47 48 49 50 51 52 53 54 55 56 57 58 59 60 61 62 63 64 65 66 67 68 69 70 71 72 73 74 75 76 77 78 79 80 81 82 83 84 85 86 87 88 89 90 91 92 93 94 95 96 97 98 99 100 101 102 103 104 105 106 107 108 109 110 111 112 113 114 115 116 117 118 119 120 121 122 123 124 125 126 127 128 129 130 131 132 133 134 135 136 137 138 139 140 141 142 143 144 145 146 147 148 149 150 151 152 153 154 155 156 157 158 159 160 161 162 163 164 165 166 167 168 169 170 171 172 173 174 175 176 177 178 179 180 181 182 183 184 185 186 187 188 189 190 191 192 193 194 195 196 197 198 199 200 201 202 203 204 205 206 207 208 209 210 211 212 213 214 215 216 217 218 219 220 221 222 223 224 225 226 227 228 229 230 231 232 233 234 235 236 237 238 239 240 241 242 243 244 245 246 247 248 249 250 251 252 253 254 255 256 257 258 259 260 261 262 263 264 265 266 267 268 269 270 271 272 273 274 275 276 277 278 279 280 281 282 283 284 285 286 287 288 289 290 291 292 293 294 295 296 297 298 299 300 301 302 303 304 305 306 307 308 309 310 311 312 313 314 315 316 317 318 319 320 321 322 323 324 325 326 327 328 329 user www www;worker_processes 8 ; error_log /usr/local/nginx/logs/error .log info ;pid /usr/local/nginx/logs/nginx.pid;worker_rlimit_nofile 65535 ;events { use epoll ; worker_connections 65535 ; keepalive_timeout 60 ; client_header_buffer_size 4k ; open_file_cache max=65535 inactive=60s ; open_file_cache_valid 80s ; open_file_cache_min_uses 1 ; open_file_cache_errors on ; } http { include mime.types; default_type application/octet-stream; server_names_hash_bucket_size 128 ; client_header_buffer_size 32k ; large_client_header_buffers 4 64k ; client_max_body_size 8m ; sendfile on ; autoindex on ; tcp_nopush on ; tcp_nodelay on ; keepalive_timeout 120 ; fastcgi_connect_timeout 300 ; fastcgi_send_timeout 300 ; fastcgi_read_timeout 300 ; fastcgi_buffer_size 64k ; fastcgi_buffers 4 64k ; fastcgi_busy_buffers_size 128k ; fastcgi_temp_file_write_size 128k ; gzip on ; gzip_min_length 1k ; gzip_buffers 4 16k ; gzip_http_version 1 .0 ; gzip_comp_level 2 ; gzip_types text/plain application/x-javascript text/css application/xml; gzip_vary on ; upstream jh.w3cschool.cn { server 192.168.80.121:80 weight=3 ; server 192.168.80.122:80 weight=2 ; server 192.168.80.123:80 weight=3 ; } server { listen 80 ; server_name www.w3cschool.cn w3cschool.cn; index index.html index.htm index.php; root /data/www/w3cschool; location ~ .*.(php|php5)?$ { fastcgi_pass 127.0.0.1:9000 ; fastcgi_index index.php; include fastcgi.conf; } location ~ .*.(gif|jpg|jpeg|png|bmp|swf)$ { expires 10d ; } location ~ .*.(js|css)?$ { expires 1h ; } log_format access '$remote_addr - $remote_user [$time_local ] "$request " ' '$status $body_bytes_sent "$http_referer " ' '"$http_user_agent " $http_x_forwarded_for ' ; access_log /usr/local/nginx/logs/host.access.log main; access_log /usr/local/nginx/logs/host.access.404 .log log404; location / { proxy_pass 127.0.0.1:88 ; proxy_redirect off ; proxy_set_header X-Real-IP $remote_addr ; proxy_set_header X-Forwarded-For $proxy_add_x_forwarded_for ; proxy_set_header Host $host ; client_max_body_size 10m ; client_body_buffer_size 128k ; proxy_intercept_errors on ; proxy_connect_timeout 90 ; proxy_send_timeout 90 ; proxy_read_timeout 90 ; proxy_buffer_size 4k ; proxy_buffers 4 32k ; proxy_busy_buffers_size 64k ; proxy_temp_file_write_size 64k ; } location /NginxStatus { stub_status on ; access_log on ; auth_basic "NginxStatus" ; auth_basic_user_file confpasswd; } location ~ .(jsp|jspx|do)?$ { proxy_set_header Host $host ; proxy_set_header X-Real-IP $remote_addr ; proxy_set_header X-Forwarded-For $proxy_add_x_forwarded_for ; proxy_pass 127.0.0.1:8080 ; } location ~ .*.(htm|html|gif|jpg|jpeg|png|bmp|swf|ioc|rar|zip|txt|flv|mid|doc|ppt| pdf|xls|mp3|wma)$ { expires 15d ; } location ~ .*.(js|css)?$ { expires 1h ; } } }
Nginx虚拟主机
如果每台linux服务器只运行了一个小网站,那么人气低,流量小的草根站长需要承担高额的服务器租赁费,也造成了硬件资源浪费。
虚拟主机就是将一台服务器分割成多个“虚拟服务器”,每个站点使用各自的硬盘空间,由于省资源,省钱,众多网站都使用虚拟主机来部署网站。
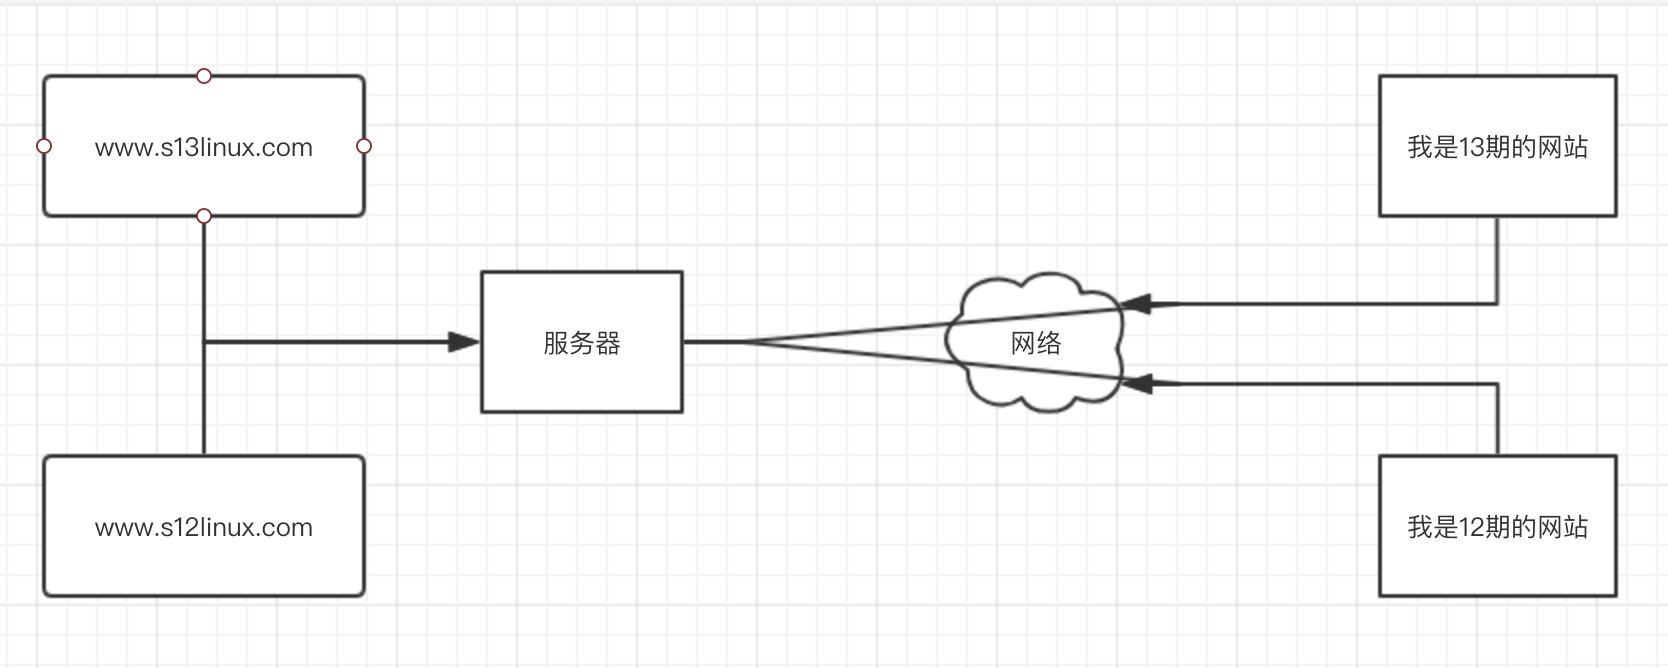
虚拟主机的概念就是在web服务里的一个独立的网站站点,这个站点对应独立的域名(IP),具有独立的程序和资源目录,可以独立的对外提供服务。nginx.conf中使用server{}代码块标签来表示一个虚拟主机。Nginx支持多个server{}标签,即支持多个虚拟主机站点。
虚拟主机类型
基于域名的虚拟主机
基于端口的虚拟主机www.diandian100.cn:9000
基于IP的虚拟主机IP区分不同的虚拟主机,此类比较少见,一般业务需要多IP的常见都会在负载均衡中绑定VIP
基于域名的多虚拟主机实战 nginx可以自动识别用户请求的域名,根据不同的域名请求服务器传输不同的内容,只需要保证服务器上有一个可用的ip地址,配置好dns解析服务。
/etc/hosts是linux系统中本地dns解析的配置文件,同样可以达到域名访问效果
修改nginx.conf 1 2 3 4 5 6 7 8 9 10 11 12 13 14 15 16 17 18 19 20 21 22 23 24 25 26 27 28 29 30 31 32 33 34 35 36 37 38 39 40 41 42 43 44 worker_processes 1 ;events { worker_connections 1024 ; } http { include mime.types; default_type application/octet-stream; sendfile on ; keepalive_timeout 65 ; server { listen 80 ; server_name tony1.to; location / { root /tmp/web/tony1; index index.html; } } server { listen 80 ; server_name tony2.to; location / { root /tmp/web/tony2; index index.html; } } server { listen 80 ; server_name localhost; location / { root html; index index.html index.htm; } error_page 500 502 503 504 /50x.html; location = /50x.html { root html; } } }
上述代码配置了2个域名分别为tony1.to、tony2.to的站点,虚拟主机的部分就是server{}里的内容
修改网站文件 测试用所以本人没有按照html标准代码规范写,甚至没有写编码格式,访问中文会乱码
1 2 3 4 5 6 7 /tmp/web/tony1/index.html # 文件内容 <h1>我是tony1</h1> /tmp/web/tony2/index.html # 文件内容 <h1>我是tony2</h1>
验证配置并启动nginx 1 2 3 4 5 [root@VM_59_235_centos conf]# ../sbin/nginx -t nginx: the configuration file /tmp/www/nginx//conf/nginx.conf syntax is ok nginx: configuration file /tmp/www/nginx//conf/nginx.conf test is successful [root@VM_59_235_centos conf]# ../sbin/nginx
修改访问主机etc linux配置的nginx,使用本地windows进行访问测试;
1 2 3 4 # 修改hosts文件,windows系统hosts目录为C:/windows/system32/driver/etc/hosts # 加入以下两条配置 111.231.99.120 tony1.to 111.231.99.120 tony2.to
测试访问
成功!!!